Showing posts with label Children's Library Program. Show all posts

Thursday, October 29, 2015

Library Halloween Party!

In a Dark, Dark Room accompanied by a BOOkmark craft 
This Saturday, I am hosting our library's Halloween party for kiddos, family, and friends.  Halloween is only my FAVORITE so I am pretty excited about it.  We will have a Spooky Storytime, Creepy Craft, and trick or treating all day (I am mostly excited about this part-- there is nothing cuter than little munchkins in costume)!

Books we will read:
Brown Bat, Brown Bat Flannel
  • In a Dark, Dark Wood by David A. Carter (pop-up book)
  • Five Little Pumpkins by Iris Van Rynbach
  • If You're a Monster and You Know It by Rebecca and Ed Emberley
Two Little Ghosties Flannel
Flannel Fun:

Brown Bat, Brown Bat, What Do You See?
(I see a yellow moon, a white ghost. a red leaf, an orange pumpkin, a green apple, and a black cat looking at me!)
Two Little Ghosties (based on Two Little Dickybirds)
Two little ghosties, looking at you!
One named "Peeka", the other named "Boo!"
Fly away Peeka, fly away Boo!
Come back Peeka, come back Boo!
For our craft, we are going to make BOOkmarks. (See what I did there?!)

Preparation for this craft was too easy.  I cut some card stock into strips, cut lengths of various ribbons, and bought a Value Pack of Halloween foam stickers from Michael's (on sale, of course!).  We tend to get a wide range of ages at our storytimes so I needed something that would be simple enough for tiny hands (cutting and pasting usually doesn't work, but stickers are great), that wasn't too "baby-ish" for the older kids.  I think this will fit the bill.

Happy Haunting, little ghosties!


Wednesday, May 27, 2015

Engineering with the Magic School Bus and Marshmallows


Another great STEAM (Science, Technology, Engineering, Art, and Math) programming idea borrowed from PBS Kids' Zoom Activities: build bridges out of toothpicks and marshmallows!  I gave children the building directive after we watched Magic School Bus Under Construction: Bridge Building.  

This program was simple, required very little preparation, and inspired great amounts of creativity and design concepts from elementary aged participants.  

To prepare, wrap two stacks of books (they must be the exact same books so that the stacks are an even height) in newspaper so you don't get sticky marshmallow residue on your library books.  This will serve as the base for your bridge.  

Watch the "Bridge Building" episode of The Magic School Bus Under Construction DVD (about 20 minutes long) and see Mrs. Frizzle's class create a bridge out of Q-tips and gum drops.

After the children see the Magic School Bus gang building a bridge, they will be eager to try doing so themselves.  Take a look at what our little aspiring engineers and architects created!  As an added challenge, once you get a bridge across your two stacks of books, add a paper clip attached to a cup and throw pennies in the cup to see how strong your bridge is.


Tuesday, February 10, 2015

Happy Birthday, Lewis Carroll!

We have a recurring program for children ages 6-12 called "Terrific Tuesdays".  What's so terrific about it?  For me, mostly the fact that I get to create a fun program using any ideas I want!  The children's staff switches off every week so the kids here at the library always get to try something different- sometimes it's a storytime, a craft, games; the sky's the limit!

I was scheduled for Terrific Tuesday on January 27th, which also happens to be the birthday of our dearly departed Lewis Carroll, the author of  Alice's Adventures in Wonderland.  So I decided to throw him a birthday (un-birthday?) party.  

I always like to make note of the literary context of my programs, so I began by asking the children if they had seen the popular Disney movie Alice in Wonderland (Most of them hadn't!). My segue into "Well did you know that it was a book before it was a movie?" didn't work well for that reason. However, I had the book out on display and after the program, many of the attendees were interested in it.

No party is complete without games- so instead of "Pin the Tail on the Donkey" (another game that most of them had not heard of or played - am I just getting old?), we played "Pin the Smile on the Cheshire Cat".  They loved it and it was super easy to create, just a bit of picture editing and playing around in Publisher, a large poster board, 11x17 paper, staples, and scotch tape.  And a lovely teen volunteer to cut out thirty cat smiles for you helps too.

"Two, Five, and Seven painting the rosebush"
Source: Alice's Adventures in Wonderland by
Lewis Carroll, illustrated by John Tenniel, 1865.
"You're nothing but a pack of cards!"
Source: Alice's Adventures in Wonderland by
Lewis Carroll, illustrated by John Tenniel, 1865.


Next, I told the children about the chapter where Alice enters the Queen of Hearts' garden to find little live playing cards painting her roses red (the Queen hates white roses!).  We made our own little card men out of playing cards, pipe cleaners, construction paper, and googly eyes.  Because we tend to get a lot of wee little ones for this program, I decided to pre-make the "bodies" of the card guys. Then they glued pre-cut hearts onto their guys, glued on eyes, and drew on faces.  I don't think I've ever had a craft program go over so well as this did.  High attendance, compliments from parents, children begging to make more... you name it!  I think it helped that Valentine's Day is coming up and these little guys would make the cutest valentines.  Interested in replicating the craft? Please do! Just follow the directions below!

Materials needed:
  • A deck of playing cards
  • Red construction paper
  • Scissors
  • Googly eyes (optional, these can also be drawn in)*
  • Red pipe cleaners
  • Gluesticks
  • Stapler
  • Pencil or lollipop for the guy to hold (also optional)**
  • Markers or crayons 
*But my rule of thumb is that everything is better with googly eyes.  
**WHY OH WHY DID I NOT THINK OF PAINTBRUSHES UNTIL JUST NOW??!!

Directions:
  1. Punch a hole in four corners of one playing card.
  2. Feed one pipe cleaner through the top two holes.
  3. Feed a second pipe cleaner through the bottom two holes.
  4. Staple another playing card to the back of the card (not required, but makes it neater and makes the pipe cleaners stay put)
  5. Pre-cut hearts about 2-3" wide for the heads
  6. ***I completed steps 1-5 ahead of time, since we get a lot of 2-4 year olds for our programs.  If you are working with older children, they may be able to do these steps themselves.
  7. Glue the heart head to the top of the card body.
  8. Glue or draw on eyes and face.
  9. Twist and twirl pipe cleaner arms and legs any way you want!
  10. Add a prop for the arms to hold if you want... something sweet like a lollipop is perfect for Valentine's Day!


Saturday, December 6, 2014

A Grinchy Program on the Fly

If you read my blog, you know that I like to be overwhelmingly prepared for my programs. I usually describe the process as "spastic" and "overdone".  Sometimes, however, the situation arises where a librarian needs to come up with a program AT THE LAST MINUTE!  That very day!  As an ultimate test to my Type-A-Librarian personality, someone called in sick on a day they were scheduled to do a program.  Being the only Children's Librarian that day, it became my responsibility to come up with something for the 30+ kids that usually show up to this afternoon program.  
Because TIS THE SEASON, and we had a copy on display, and I saw it, I decided to do a read-aloud of the old classic How the Grinch Stole Christmas by Dr. Seuss.  I remember seeing the movie many times as a child (and let's face it, every year into adulthood), but I had never read the book.  I know. Bad librarian!  Thinking this may be the case for other children, I wanted to read the book and show the movie, then talk about differences between book and movie adaptations for this school-age (6-12) program.
As I was prepping for the program, I quickly realized the difference between a CD and a DVD. Unfortunately, our library only had a copy of the CD and not the DVD, and I'd sooner die than play the Jim Carrey version (sorry Jimbo), so; first baby step: adapt!  I did not need to explain to the kids that there was not going to be a movie.  They didn't know that was my plan in the first place.  Instead of beginning a program from a place of disappointment, I set off the program by asking who had ever seen the movie.  About half of the children raised their hands.  I then told them that Dr. Seuss wrote the book long before the movie was ever made, which prompted a great discussion on other books-turned-movies, like Percy Jackson and the Olympians, Harry Potter, Diary of a Wimpy Kid, and The Lorax. Apparently Captain Underpants is even going to have his own movie- I did not know!

I also decided to take advantage of some of the lovely resources that are lurking around in the interwebs.  I love Dr. Seuss's website Seussville. There are so many fun games and printable resources.  I have used them in the past for my "Happy Birthday Dr. Seuss!" program and Oobleck program.  Seussville has many Grinchy activities, but I liked this activity book most of all.  I spent some time altering the pdf a little bit (BABY STEPS) so I could print out little 4x5" booklets instead of using a few trees' worth of paper (wouldn't the Lorax approve?).  I love this activity because it encourages kids to really think about what acts of kindness and giving can do to make a positive impact in both your and others' lives.  I just had the kids color the booklet and write in their own ideas for good deeds.  They really impressed me with their thoughtfulness and enthusiasm for the mini project.  I explained to a few little ones what "charity" meant and they really liked the idea of donating their old clothes, toys, and books to children in need.  This was a really special group of kids and I think they made MY heart grow at least three sizes that day.


Wednesday, December 3, 2014

Miss Cassie's Tea Party


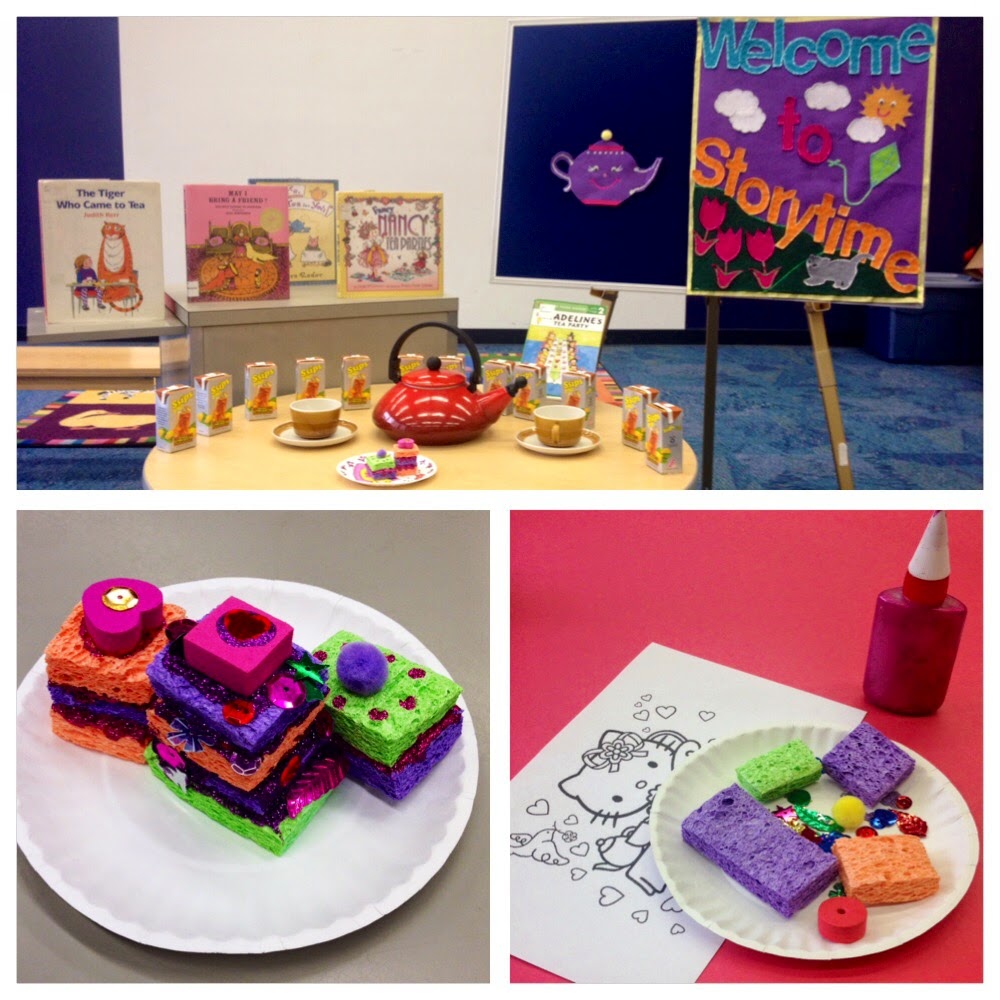
On Saturday mornings, our library holds a "Family Fun" storytime for all ages.  This is really the only time I use a theme... normally I find themes a little too limiting in terms of choosing titles that are developmentally appropriate for each age group, but this storytime being for all ages lets me broaden my horizons a bit.  And what better time for a tea party? Here is the storytime lineup:

  • Hello, How Are You?
  • If You’d Like to Read a Book, Clap Your Hands
  • The Tiger Who Came to Tea by Judith Kerr
  • Flannel and Song: I’m a Little Tea Pot
  • Madeline’s Tea Party by John Bemelmans Marciano
  • Flannel: Birthday Cake
  • Song and puppet: Muffin Man
  • Rhyme: Patty Cake
  • Tea for Me, Tea for You by Edward Gibbs
  • Song: Tea for two, two for tea, tea for you, and tea for me! I love you and you love me, we’re a happy family!
  • Song: Skidamarink
  • May I Bring a Friend? by Beatrice Schenk De Regniers
  • Song and dance: Teacup Hokey Pokey (Handle, Spout, Whole Pot)
  • Our Hands Say Thank You
After the storytime, we did a craft of making little tea cakes out of sponges, glitter glue, and sequins (inspired by The Craft Train).  I pre-cut the sponges into little rectangles and squares, and had a little "table setting" of materials laid out for each child.  They put their cakes together with "frosting" (glitter glue) and had a wonderful time.  I was also able to find these adorable tiny iced tea juice boxes that I served while we did our craft.  After all, what is a tea party without tea?!

Thursday, August 28, 2014

Eric Carle Storytime


I started planning this storytime because I was feeling "lazy" and Eric Carle books are (almost) always a hit, but lo and behold of course I ended up getting super into it. I think/hope the kids could sense my enjoyment, because this seemed to be one of my best storytimes yet, especially for toddlers!

I started by introducing Eric Carle as the author and illustrator of the books we would read today, and spoke about what that meant.

As always, we start out with my favorite, borrowed from a wise colleague: "If You'd Like to Read a Book, Clap Your Hands!":

If you'd like to read a book, clap your hands! (Clap, clap!) If you'd like to read a book, clap your hands! (Clap, clap!) If you'd like to read a book, listen up and take a look! If you'd like too read a book, clap your hands! (Clap, clap) ...followed by stomp your feet, sing hooray!

The first book I read was The Very Hungry Caterpillar in the big book format. Normally I find big books particularly awkward and steer clear of using them for that reason, but to see the lovely details in this book, you really need it for a large audience and it worked well. The little buggers get extra excited about big books, even if Miss Cassie looks like a goon trying to turn the pages. I used our butterfly puppet at the end of the book. Some people are puppet people and some people are not. I am definitely one of the former, as I love the way the little ones' faces light up almost every time I engage them with one of my puppets.

To prepare for our next book, Ten Little Rubber Ducks, we practiced counting to ten with my flannel number set. I like to include a flannel visual whenever possible. We have a huge piece of blue felt, almost blanket sized, which I draped over a large Tupperware bin that served as a little ocean backdrop for the telling of this story. In the beginning of the story, a cardboard box of rubber duckies falls out of a boat and the duckies fall into the ocean. Thus, I dumped my cardboard box of duckies into the "ocean" and squeals of delight ensued. To transition to our next book, we sang Five Little Ducks along with its flannel counterparts.

From Head to Toe is one of Eric Carle's best books for a storytime because of its participatory nature. It gets the kids moving and I like letting them move and stretch about midway through the storytime to get those ants out of their pants.  With vivid and brightly colored pictures of animals doing fun movements, we transitioned after this book to a flannel I made called "I Went to the Zoo One Day". When I went about making this flannel, I picked numerous illustrations from a wide selection of Carle's books and glued them to felt. To perform it, I pick the animals out of an envelope so that each one is a surprise, as we sing (to the tune of "London Bridge"):

I went to the zoo one day, zoo one day, zoo one day! I went to the zoo one day, and I saw a _______! (Let the children identify the animal as you put it on the flannel board)

Finally, we read Eric Carle's Have You Seen My Cat? because I can never resist a cat book. Mostly because it allows me to use my fat cat puppet. When the cat is "found" at the end of the story and I surprised the little ones with Mr. Cat who had been hiding behind the flannel board, they were beyond ecstatic at having "helped" me find my cat. As always, we ended with "Skidamarink" (because I love them oh so much, and want to tell them so) and kitty cat kisses on everyone's noses. Puppet nose kisses are something I started doing at the end of each storytime and as time has gone on, even the shyest of the toodles comes up to me for a kiss. It is actually the cutest thing you could probably ever see in your life. Just today I had a little boy get in line five extra times for a kitty cat kiss.


Tuesday, August 26, 2014

Happy (Belated) Birthday, Harry Potter!


On July 31st, 2014, Harry Potter turned 34. Instead of thinking about how old that makes me, I decided to embrace the celebration of his birth (and J.K. Rowling's) along with my co-workers in a department-wide Harry Potter Birthday Party. In Teen Space, my colleagues showed a screening of Harry Potter and the Deathly Hallows, while making pipe cleaner Harry Potter glasses, giving each other face paint lightning bolt scars, and death eater tattoos. They also enjoyed a delicious birthday cake, of course!


Over in the Children's Room, we made owl paper bag crafts, played "Wizard's Chess", and dressed up for photos in front of my Platform 9 & 3/4 Photo Booth. I did not have enough galleons, knuts, or sickles to afford Bertie Botts Every Flavor Beans for all of the attendees, so we served "Muggle Beans" (Jelly Bellys), and I made homemade Honeydukes treat bags for them to take home. The little wizards had a ton of fun posing in front of Platform 9 & 3/4 with their handmade owls, although I think I may have gotten the most involved with my Fleur Delacour/ Beauxbatons costume. One of my favorite parts of the day was when the young wizards started using spells on each other (along with my co-workers and me), who would promptly drop our wands at "EXPELLIARMUS!" and stand perfectly still at "PETRIFICUS TOTALUS!" Another extremely high point of the day was when a co-worker burst into the Children's Room, shouted, "TROLL! In the basement!" and then dramatically fainted. Overall, it was a very well attended and wonderful birthday party. I think even 34-year-old Harry Potter would have enjoyed it.


Monday, August 18, 2014

Urban Safari Storytime

Albert Paley's work on display at the Corcoran Galleries, July 2014
I recently had the wonderful opportunity to facilitate a storytime at the Corcoran Gallery of Art during a family event they held called "The Ultimate Urban Safari", based on their summer exhibition, American Metal: The Art of Albert Paley.  Paley is perhaps best known for creating the portal gates to the St. Louis Zoo, Animals Always (2006).

The Ultimate Urban Safari involved activities about animals of all types so it was easy to come up with a theme for the event's storytime.  Since this was a family program and I was expecting a variety of ages in my audience, I picked out two selections to choose from during the storytime (for a total of four books) for each storytime.  By having this variety, I was able to tailor and adapt each storytime best to the needs of my audience, along with the all-ages-friendly songs and rhymes I chose to use.

  • Opening Song: If You’d Like to Read a Book, Clap Your Hands! 
    • (If you'd like to read a book, clap your hands! If you'd like to read a book, clap your hands! If you'd like to read a book, listen up and take a look!  If you'd like to read a book, clap your hands!- Repeat with "stomp your feet, sing hooray!")
  • Count the Monkeys  by Mac Barnett OR Way Far Away on a Wild Safari  by Jan Peck 
  • Flannel: Five Little Monkeys (Jumping on the Bed)
  • If I Were a Jungle Animal  by Tom and Amanda Ellery OR Little Mouse  by Allison Murray
  • Flannel and Song: I Went to the Jungle One Day (London Bridge)
  • How to Wash a Wooly Mammoth  by Michelle Robinson OR My Rhinoceros  by Jon Agee 
  • Finger play: I Had a Little Turtle
  • The Baby BeeBee Bird  by Diane Massie OR Birds  by Kevin Henkes 
  • Ending Book and Song: If You’re Happy And You Know It  by Jane Cabrera
  • Closing Rhyme: Our Hands Say Thank You 
    • (...with a clap clap clap, our feet say thank you with a tap tap tap.  Clap clap clap, tap tap tap. And we roooolllllll our hands to say, "Goodbye!")

Of course I wore a safari hat.
Overall, this was a very successful outreach event.  I was able to connect with many families who were otherwise unfamiliar with either our library's location or programming, and even have had one little girl and her mother visit us almost every week since the storytime (this was over a month ago, I know, I am behind on blogging)!  It is also a great experience to be able to adapt your storytime for an all-ages audience.  Frequently, even if I have planned a storytime for Preschoolers and all babies show up, I need to quickly adapt anyways- and this is an important skill for any librarian to have.  And the setting was not too bad either... I believe I was in the Director's Office! The Corcoran is a beautiful building that houses even more beautiful art to see- this outreach was definitely worthwhile in many ways.


Tuesday, August 5, 2014

STEAM Team: Nature Hide and Seek with the Smithsonian American Art Museum

Peacock in the Woods, Abbott Handerson Thayer, 1907

Science and Art intersected in last week's STEAM Team program for children aged 6-12. Experts from the Smithsonian American Art Museum came to the Library to talk to attendees about Abbott Handerson Thayer and his artwork.

Here are some Thayer's paintings that we discussed.  Thayer is credited by many to be the "Father of Camouflage", in the way he painted animals whose colors adapted to their natural surroundings so that they would be hidden, or camouflaged from predators. We learned about countershading, disruptive patterning, and other ways of camouflaging through art.

According to Richard Meryman from Smithsonian Magazine, "Thayer contended that even brilliantly plumaged birds like the peacock can blend into, and thus be camouflaged by, their habitats." Thayer created the above painting, Peacock in the Woods, to illustrate this theory. Thayer was often criticized for his theories on camouflage, even by Theodore Roosevelt himself, but that never stopped him from rallying for its use as a military strategy during World War I. He thought that a wartime boat could be camouflaged in water the same way an animal camouflages itself in nature, another theory we will be discussing during STEAM Team.


Angel, Abbot Handerson Thayer, 1887

After our discussion about Abbott Handerson Thayer and his artwork, participants of STEAM Team got the chance to create their own piece of art of a camouflaged animal, using collage materials such as magazines, patterned paper, glue, feathers, and more!

My favorite part of the program?  The moment an extremely eager eight year old boy excitedly interrupted the Smithsonian's presentation to announce that Thayer's Angel painting "LOOKS JUST LIKE MISS CASSIE."

Tuesday, July 8, 2014

STEAM Team: Oobleck! Dr. Seuss and Science


Literature and/or reading is not a component of STEAM (Science, Technology, Engineering, Art and Math), but must I mention how much it is a part of LIBRARIES? Didn't think so!  This week's STEAM Team focused on science and literature.

Inspired by Dr. Seuss' Bartholomew and The Oobleck, we conducted a science experiment by creating the mysterious green substance known as Oobleck, which has both solid and liquid properties! That is, if you pour it or dip your fingers in it, it acts like a liquid. But if you squeeze it, push it, or otherwise apply pressure to the mixture, it acts like a solid! Want to "walk on water"? Make enough Oobleck to cover your floor! (Disclaimer: this is not recommended, as clean-up may require a visit from the Cat in the Hat.)

This program was met with much excitement and enthusiasm, which I think is to be expected for anything involving "green slime".  I began the program by book talking Bartholomew and the Oobleck, and then read the Royal Magicians' magic spell aloud (paragraph 32):
Oh, snow and rain are not enough!
Oh, we must make some brand-new stuff!
So feed the fire with wet mouse hair,
Burn an onion. Burn a chair.
Burn a whisker from your chin
And burn a long sour lizard skin.
Burn yellow twigs and burn red rust
And burn a stocking full of dust.
Make magic smoke, green, thick and hot!
(It sure smells dreadful, does it not?)
That means the smoke is now just right
So, quick! Before the day gets light,
Go, magic smoke! Go high! Go high!
Go rise into the kingdom’s sky!
Go make the oobleck tumble down
On every street, in every town!
Go make the wondrous oobleck fall!
Oh, bring down oobleck on us all!
I mixed up a batch of Oobleck myself, explaining the ingredients and measurements as I went along. As I poured a bit in each child's plastic cup, I asked them if they thought it was liquid or solid.  Most of them guessed liquid.  Then I asked them to pick up some of the Oobleck and try to roll it into a ball.  "Is it still liquid?" I asked.  They got very excited when they realized that it was both a liquid AND a solid- the scientific term for which is "non-Newtonian".  Lots of experimenting ensued.

I was glad I did not allow each child to mix up his/her own batch- it actually takes a bit of trial and error to get the exact right consistency; and the mess I was left with after the experiment was plenty.  It looked much worse than it actually was, however.  Since Oobleck is just cornstarch and water, I waited until it dried and vacuumed it right up out of the carpet.  Tables and chairs needed a simple Clorox wipe.

I sent each child home with a handout including the following recipe and and experiment ideas, along with this coloring sheet from Seussville, one of my favorite websites on the interwebs.  The coloring sheet was also a nice supplement for toddling little brothers and sisters who were too young to participate in the experiment (intended for children ages 6-12).

Oobleck Recipe!

Ingredients:
  • 1 cup water
  • 1.5 - 2 cups cornstarch
  • Green food coloring 
Directions:
Mix water, cornstarch, and food coloring in a bowl. Start with water and add cornstarch slowly until your Oobleck is the right consistency: it should feel a little but like honey and tear a little if you drag your fingers over it.

Experiments:
  • Form Oobleck into a ball, then let go, letting the mixture run between your fingers. 
  • Pour Oobleck onto a plate and slap it with your hand. 
  • Try to form Oobleck into a shape. Can you make it stay that way? 
  • Drop different items into Oobleck (pennies, paperclips, popsicle sticks) – do they float or sink? 
  • Poke the Oobleck quickly. What happens? How does it feel? 

Continue Experimenting at Home:
  • What happens when you put Oobleck in the Freezer? 
  • What happens when warm up Oobleck in the sun? 
  • Put Oobleck in both a sealed and an unsealed container on the window sill. What happens over time? Draw illustrations of the results. 
  • Make Oobleck with different variations of ingredients: hot water, cold water, more water, less water, more cornstarch, less cornstarch, etc. Are the new mixtures’ properties any different?

Sunday, May 11, 2014

Happy Mommy's Day!


Sometimes unplanned "programs" are the best ones.  When I realized that we didn't have anything planned at the Library for Mother's Day, I quickly googled "how to make tissue paper flowers".  I found an excellent tutorial here.  I put out a sample flower of mine and sign that said, "Happy Mother's Day!  To make a special flower for your mom, please ask a Librarian for materials."  The materials are so simple- tissue paper, scissors and pipe cleaners!  I also cut out some paper butterflies using our AccuCut so that kids could give their flowers a label.  I tried prying a couple of kids off of the computers with no avail, but shortly a couple of families came in and the kids were very eager to make flowers for their mothers.

One little boy was getting ready to write on his butterfly, and asked me if he could write in another language.  I replied, "of course!  It's your flower!"  He wrote, "Te Amo, Mami".  When he handed it to his mother I could see that she was so proud and touched by his sweet little gift.  After making a few flowers, a little girl who spoke English as a second language sat down with me and we read Goodnight Gorilla by Peggy Rathmann together (she picked it out!), and after that she read it aloud to her mother.  Her mother, who seemed to speak limited English herself, beamed with pride as her little girl read to her.  Even though I had to work today and therefore could not spend the day with my own lovely mother, it's these interactions that make my job truly wonderful.  


Monday, April 14, 2014

Celebrating Caldecotts

Image via RandophCaldecott.org.uk
Beginning in 1937, the ALA began awarding the prestigious Caldecott medal to the illustrator of America's "most distinguished picture book for children." The medal gets its name from Randolph Caldecott, an influential 19th century English illustrator. The image on the Caldecott medal comes from his illustrations for The Diverting History of John Gilpin, a poem written by William Cowper.  Check out the entire list of Caldecott winners and Honors (runners-up) and pick out your favorite!

Children and their families got to enjoy a special Caldecott-themed storytime and craft this past weekend.  It was a beautiful day so I had a low turn-out for the storytime, but I continued to have the kids do the craft throughout the day and they LOVED it!  I started out the storytime by pointing out the "shiny gold sticker" on each book, and explained that it was a very special award.  I asked them to pay close attention to each book's pictures, since that is what they won their award for.  I had a small group of very eager and interested participants.

Here is the lineup...
  • Song: Hello, How Are You?
    • Our "Hello" song.
  • Book: A Sick Day for Amos McGee by Erin and Philip Stead (Winner, 2011)
    • One of my personal favorites, a sleepy story that went over surprisingly well with the little ones.
  • Song and Flannel: "I Went to the Zoo One Day" (sung to the tune of London Bridge)
    • I went to the zoo one day, zoo one day, zoo one day, I went to the zoo one day and I saw a _________! (Use flannels of different zoo animals and have children identify each one you put up on the board.)
  • Book: King Bidgood's in the Bathtub by Don and Audrey Wood (Honor, 1986)
    • Not as much of a hit as it has been in the past for preschool storytime, probably because this crowd was on the younger side and did not understand the story's silliness.
  • Flannel: Rub a Dub Dub Three Bears in a Tub
    • Bears are easier to make out of flannel than men!
  • Book: Kitten's First Full Moon by Kevin Henkes (Winner, 2005)
    • Probably the favorite pick for this group, little kitten is so endearing.
  • Flannel: Where is Kitten?
    • Substituted a flannel kitten for Mouse in the House- this flannel is always a favorite.  By chance the kitten was in the last house picked, and I had the kids meow so that kitten would be less shy and come out of her hiding spot.  They were thrilled.
  • Joseph Had an Overcoat by Simms Taback (Winner, 2000)
    • Attention spans were wandering at this point.  I would try it again as a first book.
  • Our Hands Say Thank You
    • Our "Goodbye" song.

For our craft I had children make their own Caldecott books.  The prep work for this project was extremely high but I do believe it was worth the effort because I've never seen a craft go over so well! They were so very proud of their Caldecott creations.  I pre-made booklets out of construction paper and blank white paper, and glued color-printed cutouts of the Caldecott medal to AccuCut award ribbons.  It was their job to glue their award onto the book, and to write and/or color pictures to create their own Caldecott winning story.  We had a story about a kitten, a dog, a bird, and someone named "Crispy" who found a map.  "Reading" their stories as they beamed with pride was my favorite part of the day.

Tuesday, April 1, 2014

STEAM Team: Robot Making!


This week's STEAM Team combined Technology, Engineering, and Art when I had participants create their own "robots" out of recyclable materials.  It only took me a couple of weeks to safe dozens of recyclables, especially thanks to it being the time of the year for Girl Scout Cookies.

Along with cans, boxes, aluminum foil, and bottles of all sorts, I provided many random things from the craft closet that I thought would make good robot parts: googly eyes, buttons, beads, dixie cups, masking tape, and plastic springs.  

Boys and girls alike were ECSTATIC about this program.  They loved picking out their own robot
parts and many kids made more than one robot.  I encouraged the children to design their robot with a purpose by asking, "What would you like your robot to do?  I want a robot that will walk my dog!"

They were creative and thoughtful, and used wonderful engineering skills to make their robots stand and balance. Many of them created their robots while not only doing the robot, but also speaking in robot language, which was pretty amazing.

This program was singlehandedly the most successful I've had in promoting our library collection, as every participant wanted a robot book to take home along with their new robot friend.


Wednesday, March 19, 2014

Purim Party

The Purim Story

I am dressed up as Queen Esther!
Purim is a celebration of the Jewish people's salvation against threat of annihilation. In 4th century BCE, King Ahasuerus of Persia had a pageant to find a new wife after becoming angry with his current wife, Queen Vashti. He chose a Jewish girl named Esther, who had a cousin named Mordecai. Haman, the King's advisor, became angry with Mordecai when he refused to bow to him. Because of this, Haman resolved to have all the Jews in Persia killed. Queen Esther, who had not yet told the King that she was Jewish, told the King that if he let Haman kill all the Jews, he would have to kill her too. The King protected his wife and her people, and instead had evil Haman punished.  
Purim Traditions
Purim, therefore, is a celebration of life, and is a time for feasts and happiness. Hamantaschen, or "Haman's pockets" are pastries traditionally served during Purim. It is also customary to give to the poor during Purim, as well as dress in costume. This is partially because "Esther" means "hidden," and because she hid her Jewish origin from the King in the beginning. Another reason for wearing costumes during the holiday is that Purim is called a miracle "disguised in natural events," in comparison to overt miracles seen in other Jewish holidays. One fun thing for children to do during Purim is make groggers, or noisemakers. These noisemakers are to be used whenever the name "Haman" is spoken, so as to drown out the evil name.

At our library Purim Party, I told the story of Purim according to the book It Happened in Shushan: A Purim Story by Harriet K. Feder. The book doesn't have traditional illustrations, it rather intersperses pictures or symbols into the text to tell the story. To make the story interactive for the children, I made little flags for each character in the story: King Ahasuerus, Queen Vashti, Queen Esther, Cousin Mordecai, and Evil Haman. I made each character flag a particular color so that when each character was mentioned, I could announce, "Queen Esther! Hold up your purple flags!", for example. The children loved being involved and with the exception of no one wanting to be Haman (and why would they?), I think the interactive storytelling went well.

We also read Sammy Spider's First Purim by Sylvia A Rouss, which is an excellent book for showing little ones what the traditions of Purim are. We learned about going to the Synagogue, wearing costumes, making Hamantaschen ("Haman's Pockets"), and groggers. Groggers are noisemakers that children use whenever you hear Hama's name on Purim, so as to drown out the sound of the evil man's name.

This book was a great transition into our crafting for the party because we got to make groggers just like the one in the book. I premade the groggers by folding a paper plate in half, filled with a handful of dried pinto beans, and stapled along the edges. The children decorated their groggers with feathers, buttons, markers, and glitter glue. They also decorated masquerade masks which we wore as we paraded through the library, noisily shaking our groggers and shouting, "Happy Purim!" (The kids love being told to be noisy in the library!) My lovely coworker who assisted me with the program bought handmade hamantaschen from a local Jewish bakery and eating the delicious treats was a lovely ending to a lovely program. I don't think we had many children come to the library specifically for the program, but it was a busy enough Sunday where I was able to pull a bunch of kids away from the computers (yay!) and I had many children and parents thank me afterwards and tell me how much fun they had. They really enjoyed learning about and celebrating Purim!

Saturday, March 15, 2014

STEAM Team: Art with Andy Warhol

Every Friday, our library hosts a "STEAM Team" program for children aged 6-12. STEAM is a framework for learning based on Science, Technology, Engineering, Art, and Math. 

I of course had to choose the main topic of Art when I led this program because there's really no subject I enjoy more.  I decided to have the children focus on the great American Pop artist Andy Warhol.  We started the program with a viewing of  Andy Warhol from Mike Venezia's "Getting to Know the World's Greatest Artists" series, based upon the identically titled popular book series also by Venezia.  The movie was about 20 minutes long, and was colorful and engaging for the kids. I had a child as young as three and as old as 10 present, and it seemed to appeal to all the age groups.


After the film, we made our own Pop Art projects.  I pre-cut many different colors of rectangles, kittens, and puppies (using the AccuCut) so that kids could pick out their own colors.  When they chose four rectangles, they glued them on to a sheet of construction paper for the background of the project. I made a sample project layering the kittens in the style of Warhol's Pop Art prints.  Not only did the children catch on to the layering technique right away, but I was also thrilled when they got super creative with their own projects.  (I always try to encourage them that their projects do not need to look like mine- I want them to be creative!)  As you can see, that is exactly what they did- we even had a child who wanted to use puppies and kittens (see below)!  They loved picking out their own colors and so far I haven't met a child get who did not like playing with glue.  Parents were thrilled and said they could not wait to come back for another STEAM event the following week. 


Tuesday, March 4, 2014

Happy Birthday, Dr. Seuss!


Dr. Seuss, born Theodor Seuss Geisel on March 2nd, 1904, has published 42 beloved children's books throughout his life of 87 years.  On March 2nd, 2014, we celebrated what would have been his 110th birthday.

We began with a special Dr. Seuss Storytime:
  • Song: "Hello, How are You?"
    • Our typical "Hello" song for storytimes.
  • Song: "Happy Birthday, Dr. Seuss"
    • This one is a bit self-explanatory, yes?
  • Flannel: One Fish, Two Fish, Red Fish, Blue Fish by Dr. Seuss (1960)
    • This book is a little but too long and confusing for the storytelling format, so I made it into a flannel!  They liked chanting along with me: "One fish, two fish, red fish, blue fish! Black fish, blue fish, old fish, new fish!"
  • Book: Gerald McBoing Boing by Dr. Seuss (1950)
    • One of Dr. Seuss's lesser known works, Gerald McBoingBoing was a film that Dr. Seuss made in 1950 that went on to win an Academy Award in 1951.  It was adapted into the picture book format in 1978 by Mel Crawford.  I took this as an opportunity to explain to kids that while many books can become movies (like The Cat in the Hat, The Lorax, and How the Grinch Stole Christmas, it can work in the opposite way!  The kids liked making the silly noises that Gerald makes throughout the book.
  • Flannel: The Cat in the Hat by Dr. Seuss (1957)
    • Another example of a great book that doesn't work too well for reading to a large audience, I adapted this too as a flannel activity.  On pages 20-21, the Cat in the Hat is showing off to Sally and her brother how many things he can hold while hopping on a rubber ball.  I turned each of these items into flannel pieces and asked the kids how many items they thought he could hold without falling down or dropping any of them.  It sort of ended up like playing "Jenga" on the flannel board with the kids anxiously watching me add item after item while reading along the text on page 20. On the next page follows, "That is what the cat said... Then he fell on his head!  He came down with a bump from up there on the ball.  And Sally and I, we saw all the things fall!"  As I read this text, I swiped my hand over the flannel board and watched as the Cat in the Hat fell down along with all of his silly items.  The kids loved it.
  • Book: My Many Colored Days by Dr. Seuss (1973)
    • This is another lesser known work of Dr. Seuss, perhaps because it is not self illustrated, instead with pictures by Steve Johnson and Lou Fancher.  Still it is a great storytime book about colors and feelings, and the kids enjoyed helping me identify the colors on each page.
  • Song: Silly Hat 
    • Since the Cat in the Hat has a silly hat, I brought out my silly hat to show my friends and sing this favorite song.
  • Book: Mr. Brown Can Moo! Can You? by Dr. Seuss (1970)
    • This book is a wonderful participatory book that gives great variation on the typical animal noises we see in these types of books. Along with "Moo, Moo", the kids got to make all kinds of noises, like "Choo Choo", "Sizzle Sizzle", and "Tick Tick Tock", among many others!
  • Flannel: Cat under the Hat 
    • Borrowed from my "Silly Hat" storytime, this is another great flannel that can be adapted for almost any theme.  I explained to the kids that instead of wearing his hat, the Cat in the Hat was hiding and they had to help me find him!  They excitedly found him on the third try (he was under the purple hat).
  • Our Hands Say Thank You 
    • Our typical goodbye routine for storytimes.  The kids love to clap, tap their feet, and "Rollllll our hands to say 'Goodbye'!"

Dr. Seuss Crafts

After our storytime, the kids were able to do my favorite activity: crafts!  I was very excited about the Lorax mustaches on a stick, but I think the kids liked the Dr. Seuss hats better because it was a little bit easier for them (the approximate age of my audience was 4 or 5 years old).  Anyways it was nice to give them a choice of what to do and a lot of kids did both, and they were super cute running around wearing their hats and mustaches together.


For materials, we are lucky enough to have a silly hat pattern for our Accucut, which I punched out of cardstock and cut long strips of paper for the base of the hat: super easy prep work!  The Lorax mustaches were a bit more involved.  I drew the mustache then made copies of it on cardstock, cut up bits of yarn for Lorax fur, and found some foam beads in the craft closet to use as Lorax noses.  If I had had more time I think it would have helped to cut out the mustaches myself, because that's where a lot of kids got snagged up and needed help or said it was too hard and wanted to make the hat instead.  Other necessary materials to have on hand were markers, glue, scissors, and popsicle sticks.

Overall the birthday party was a wonderful success.  I will be repeating the storytime for my preschool daycare groups that come in this week since they weren't here for the party.

One more activity that I had available for the kids: coloring sheets, mazes, word-searches and other printable activities from Seussville.  What a wonderful resource!  I will leave these out for kids to work on throughout the month of March.


Tuesday, February 4, 2014

Freedom Quilt


This past weekend we hosted a Black History Month Kickoff Celebration.  My coworkers hosted a puppet show/ storytime, and I helped the kids to create our library's very own Freedom Quilt!

Legend has it that during the times of the Underground Railroad, African American slaves used quilts along the Underground Railroad to communicate messages and signals that would help them to escape to freedom. Different patches on these Freedom Quilts conveyed varying messages, such as following the North Star, identifying friendly houses for shelter, or following a safe mountain trail.

To prepare for this craft program, I pre-cut quilt squares made from some patterned paper I found in our magical craft closet.  I hole punched each corner and added a bit of red yarn to all four corners of each square.  Finally, I pre-cut a variety of squares and triangles so that the children could make their own patterns on their quilt squares.  I provided some examples for them to look at (Shoofly, Monkey Wrench, Hourglass, Star, Crossroads, and Flying Geese) and was pleasantly surprised when all of the participants creatively came up with their own designs by cutting, coloring, and gluing the shapes onto their squares.

Once the squares dried overnight, I tied each corner together to make our quilt.  There was a fairly heavy amount of prep-work involved with this project, but I am so pleased with the results.  The quilt is now proudly hung on display outside our children's room.  Not one child was disappointed that they couldn't take their quilt square home; instead they were excited and proud to have their work displayed in the library! 

Monday, January 27, 2014

Martin Luther King Jr. Peace Mural

A staff member at another branch had a wonderful idea for a creative collaboration among the different branches of our library system.  Each branch made a Peace Mural in honor of Martin Luther King Jr's birthday.  The murals will eventually be put together into one large mural that will go on display here at our main library.


I chose AccuCut stencils of a dove and of Martin Luther King Jr.'s silhouette for the kids to decorate. We had some cut-outs in the Children's Room and some in Teen Space for kids to complete throughout King Week.  We encouraged them to decorate their "peace symbols" with their own ideas of what peace means, as well as their dreams of peace in the style of Martin Luther King Jr's "I Have a Dream" speech.
I was very impressed at the amount of participation that went into this passive program, especially from teenagers who are usually so reluctant to participate in library programming.  As you can see, however, many children and teens were able to express their ideas of peace creatively and beautifully (and adorably!).  I am thrilled with the results.