Showing posts with label Craft. Show all posts

Thursday, October 29, 2015

Library Halloween Party!

In a Dark, Dark Room accompanied by a BOOkmark craft 
This Saturday, I am hosting our library's Halloween party for kiddos, family, and friends.  Halloween is only my FAVORITE so I am pretty excited about it.  We will have a Spooky Storytime, Creepy Craft, and trick or treating all day (I am mostly excited about this part-- there is nothing cuter than little munchkins in costume)!

Books we will read:
Brown Bat, Brown Bat Flannel
  • In a Dark, Dark Wood by David A. Carter (pop-up book)
  • Five Little Pumpkins by Iris Van Rynbach
  • If You're a Monster and You Know It by Rebecca and Ed Emberley
Two Little Ghosties Flannel
Flannel Fun:

Brown Bat, Brown Bat, What Do You See?
(I see a yellow moon, a white ghost. a red leaf, an orange pumpkin, a green apple, and a black cat looking at me!)
Two Little Ghosties (based on Two Little Dickybirds)
Two little ghosties, looking at you!
One named "Peeka", the other named "Boo!"
Fly away Peeka, fly away Boo!
Come back Peeka, come back Boo!
For our craft, we are going to make BOOkmarks. (See what I did there?!)

Preparation for this craft was too easy.  I cut some card stock into strips, cut lengths of various ribbons, and bought a Value Pack of Halloween foam stickers from Michael's (on sale, of course!).  We tend to get a wide range of ages at our storytimes so I needed something that would be simple enough for tiny hands (cutting and pasting usually doesn't work, but stickers are great), that wasn't too "baby-ish" for the older kids.  I think this will fit the bill.

Happy Haunting, little ghosties!


Sunday, March 22, 2015

DIY Snow Globes


What a fun craft this ended up being!  I would recommend it only for ages 12 and above.  Just having teenagers and myself doing the craft, our programming rooms still looks like a unicorn exploded in the sink.  Other than a little mess and a little practice, (and a little hot glue burn on my thumb), this craft was very simple.  We googled "how to make your own snowglobe", and purchased miniature glass jars (my colleague found a box of 20 for $20 in the wedding aisle of our local craft store!), a small bottle of glycerin, and lots and lots of glitter.  

I also decided to buy my own personal larger mason jar and merman figurine, because I wanted a merman snow globe.  Legit, right?  The snow globes themselves were assembled in a few easy steps:

Materials:
  • Small jars with lids
  • Figurines, photos, or magazines
  • Hot glue gun 
  • Glitter and/or sequins
  • Glycerin
  • Water
  • Felt and yarn, optional
Directions:

  • Glue your figurine (Harry Potter Lego guy, if you have it) with hot glue to the lid of the jar OR
  • Cut a picture (of Taylor Swift) out and laminate it with packing tape; glue to the back of the jar
  • Add glitter and/or sequins
  • Add one drop of glycerin 
  • Add water to top of jar
  • Screw on lid! As tightly as you can!
  • Shake it, shake it off
  • For upside down snow globes (where the lid is on the bottom), seal the lid with hot glue so that the water doesn't leak out.  
  • Optional: Rubber band a piece of felt around the lid of your jar, trim sides, and tie a piece of yarn around the base, as pictured in the merman snow globe.

My large merman snow globe ended up having to go without water because I couldn't seal it off without leaking.  Probably because I bought one of those mason jars with the two part lid! Oh, well. He will still be proudly displayed on my desk in all his glory.  Along with Taylor Swift and Harry Potter!

Tuesday, February 10, 2015

Happy Birthday, Lewis Carroll!

We have a recurring program for children ages 6-12 called "Terrific Tuesdays".  What's so terrific about it?  For me, mostly the fact that I get to create a fun program using any ideas I want!  The children's staff switches off every week so the kids here at the library always get to try something different- sometimes it's a storytime, a craft, games; the sky's the limit!

I was scheduled for Terrific Tuesday on January 27th, which also happens to be the birthday of our dearly departed Lewis Carroll, the author of  Alice's Adventures in Wonderland.  So I decided to throw him a birthday (un-birthday?) party.  

I always like to make note of the literary context of my programs, so I began by asking the children if they had seen the popular Disney movie Alice in Wonderland (Most of them hadn't!). My segue into "Well did you know that it was a book before it was a movie?" didn't work well for that reason. However, I had the book out on display and after the program, many of the attendees were interested in it.

No party is complete without games- so instead of "Pin the Tail on the Donkey" (another game that most of them had not heard of or played - am I just getting old?), we played "Pin the Smile on the Cheshire Cat".  They loved it and it was super easy to create, just a bit of picture editing and playing around in Publisher, a large poster board, 11x17 paper, staples, and scotch tape.  And a lovely teen volunteer to cut out thirty cat smiles for you helps too.

"Two, Five, and Seven painting the rosebush"
Source: Alice's Adventures in Wonderland by
Lewis Carroll, illustrated by John Tenniel, 1865.
"You're nothing but a pack of cards!"
Source: Alice's Adventures in Wonderland by
Lewis Carroll, illustrated by John Tenniel, 1865.


Next, I told the children about the chapter where Alice enters the Queen of Hearts' garden to find little live playing cards painting her roses red (the Queen hates white roses!).  We made our own little card men out of playing cards, pipe cleaners, construction paper, and googly eyes.  Because we tend to get a lot of wee little ones for this program, I decided to pre-make the "bodies" of the card guys. Then they glued pre-cut hearts onto their guys, glued on eyes, and drew on faces.  I don't think I've ever had a craft program go over so well as this did.  High attendance, compliments from parents, children begging to make more... you name it!  I think it helped that Valentine's Day is coming up and these little guys would make the cutest valentines.  Interested in replicating the craft? Please do! Just follow the directions below!

Materials needed:
  • A deck of playing cards
  • Red construction paper
  • Scissors
  • Googly eyes (optional, these can also be drawn in)*
  • Red pipe cleaners
  • Gluesticks
  • Stapler
  • Pencil or lollipop for the guy to hold (also optional)**
  • Markers or crayons 
*But my rule of thumb is that everything is better with googly eyes.  
**WHY OH WHY DID I NOT THINK OF PAINTBRUSHES UNTIL JUST NOW??!!

Directions:
  1. Punch a hole in four corners of one playing card.
  2. Feed one pipe cleaner through the top two holes.
  3. Feed a second pipe cleaner through the bottom two holes.
  4. Staple another playing card to the back of the card (not required, but makes it neater and makes the pipe cleaners stay put)
  5. Pre-cut hearts about 2-3" wide for the heads
  6. ***I completed steps 1-5 ahead of time, since we get a lot of 2-4 year olds for our programs.  If you are working with older children, they may be able to do these steps themselves.
  7. Glue the heart head to the top of the card body.
  8. Glue or draw on eyes and face.
  9. Twist and twirl pipe cleaner arms and legs any way you want!
  10. Add a prop for the arms to hold if you want... something sweet like a lollipop is perfect for Valentine's Day!


Wednesday, December 3, 2014

Miss Cassie's Tea Party


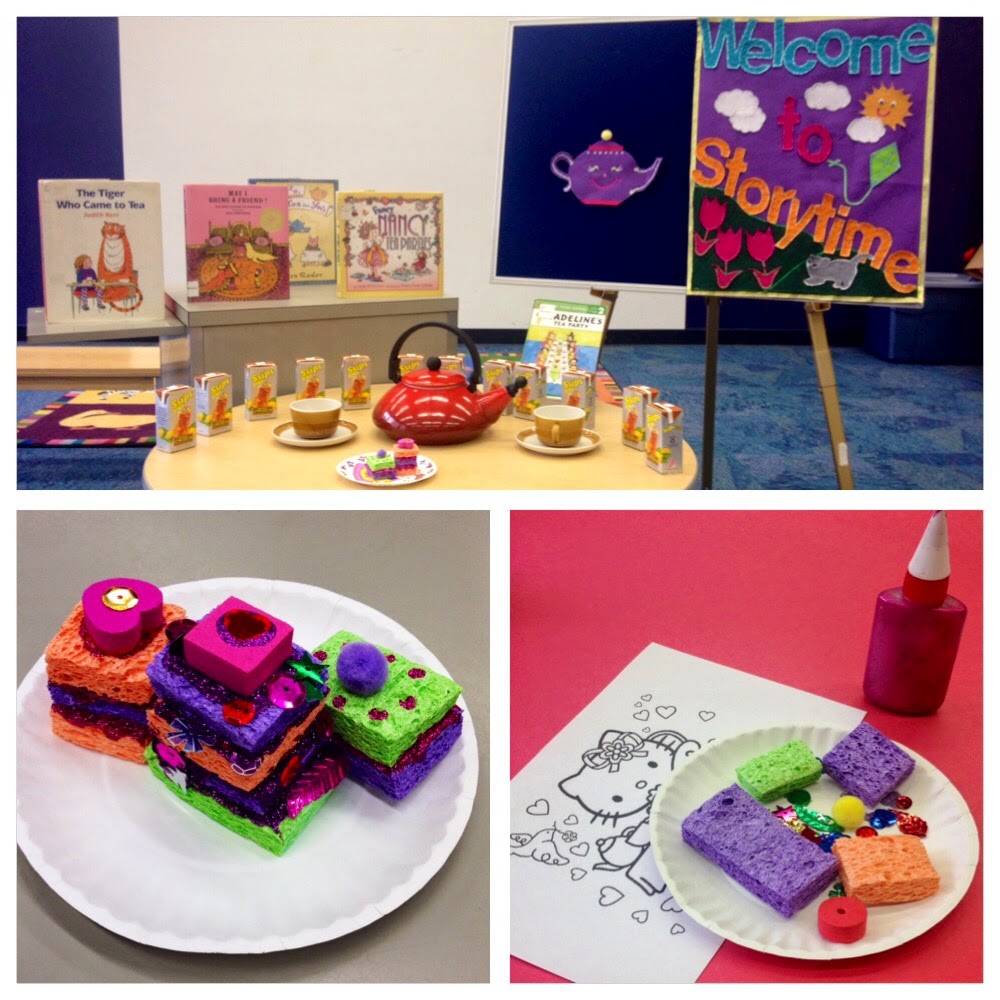
On Saturday mornings, our library holds a "Family Fun" storytime for all ages.  This is really the only time I use a theme... normally I find themes a little too limiting in terms of choosing titles that are developmentally appropriate for each age group, but this storytime being for all ages lets me broaden my horizons a bit.  And what better time for a tea party? Here is the storytime lineup:

  • Hello, How Are You?
  • If You’d Like to Read a Book, Clap Your Hands
  • The Tiger Who Came to Tea by Judith Kerr
  • Flannel and Song: I’m a Little Tea Pot
  • Madeline’s Tea Party by John Bemelmans Marciano
  • Flannel: Birthday Cake
  • Song and puppet: Muffin Man
  • Rhyme: Patty Cake
  • Tea for Me, Tea for You by Edward Gibbs
  • Song: Tea for two, two for tea, tea for you, and tea for me! I love you and you love me, we’re a happy family!
  • Song: Skidamarink
  • May I Bring a Friend? by Beatrice Schenk De Regniers
  • Song and dance: Teacup Hokey Pokey (Handle, Spout, Whole Pot)
  • Our Hands Say Thank You
After the storytime, we did a craft of making little tea cakes out of sponges, glitter glue, and sequins (inspired by The Craft Train).  I pre-cut the sponges into little rectangles and squares, and had a little "table setting" of materials laid out for each child.  They put their cakes together with "frosting" (glitter glue) and had a wonderful time.  I was also able to find these adorable tiny iced tea juice boxes that I served while we did our craft.  After all, what is a tea party without tea?!

Tuesday, December 2, 2014

Happy (Belated) Thanksgiving!

It's beginning to look a lot like Christmas!  But let's not forget about one of my favorite holidays, Thanksgiving: a day that's wonderful not only because of the delicious meal with which we celebrate it, but also for the reminder to think about the many things for which we are grateful.  I have a lot to be thankful for this year: my one year old puppy, Oliver, my family, my health, and a job that is so incredibly rewarding and fulfilling!  Not many people can say that they have a job that they look forward to going to every day.  Every day except for Monday, that is, but that's just because I sleep like a perpetual teenager.  Once I've had my coffee I am always happy to be back at work again, because I get to do fun stuff like the following.
Every Wednesday our library holds a program called "Wacky Wednesday"- a program intended for school-aged children (6-12), where kids can come to the library after school for a fun activity.  For the night before Thanksgiving, I decided of course to have a turkey related program.
First, I read Turkey Trouble by Wendy Silvano. The kids were really engaged with the story, which was especially great given the wide range of ages: I ended up having children as young as three and as old as eight attend the program.  I have a flannel that I created for the story.  The book adapts well for the flannel format as the turkey keeps on trying to outsmart the farmer by dressing up as different farm animals so he doesn't end up being Thanksgiving dinner!  I like to use a flannel whenever possible to add that extra visual engagement with a story.
Next, we did a Turkey Book craft borrowed from B-Inspired Mama.  I pre-made little books for the kids by folding a paper bag in half, hole punching two holes along the fold, and affixing a rubber band around a popsicle stick to create the book's spine.  Initially, I created a model craft very much like the example from the aforementioned blog post, but instead used AcccCut maple leaves for the turkey's feathers.
However, with a busy week before Thanksgiving, I ran out of time to pre-cut the features of the turkey's face.  To make my life easier, I just used AccuCut turkeys for the kids to decorate and paste onto their books.  I ended up not making an example to show them, which I think helps encourage kids' creativity because they are then not preoccupied with making their craft look just like the example.  I also wrote "I'm Thankful For..." along each spine to encourage kids to think about the true meaning of Thanksgiving and decorate their books with things they are thankful for.  I melted a little bit (actually, a lot) when a little cutie drew herself and me and told me, "I'm thankful for you, Miss Cassie."  Then she drew her mom and dad on the next page.  Sweetness overload!
I really liked this craft and plan on using it again in the future- you could use countless themes by having kids create a book about really anything, and the preparation ended up being a lot easier than I thought, once I decided to calm down and not be so type-A about having everything perfect.  I need to remind myself of this often, I think that a lot of librarians have the tendencies to be perfectionists, but when it comes to kids crafting, letting them do their own thing ends up being much better for all of us.
Thanks for reading and hope you all had a wonderful Thanksgiving!


Tuesday, August 26, 2014

Happy (Belated) Birthday, Harry Potter!


On July 31st, 2014, Harry Potter turned 34. Instead of thinking about how old that makes me, I decided to embrace the celebration of his birth (and J.K. Rowling's) along with my co-workers in a department-wide Harry Potter Birthday Party. In Teen Space, my colleagues showed a screening of Harry Potter and the Deathly Hallows, while making pipe cleaner Harry Potter glasses, giving each other face paint lightning bolt scars, and death eater tattoos. They also enjoyed a delicious birthday cake, of course!


Over in the Children's Room, we made owl paper bag crafts, played "Wizard's Chess", and dressed up for photos in front of my Platform 9 & 3/4 Photo Booth. I did not have enough galleons, knuts, or sickles to afford Bertie Botts Every Flavor Beans for all of the attendees, so we served "Muggle Beans" (Jelly Bellys), and I made homemade Honeydukes treat bags for them to take home. The little wizards had a ton of fun posing in front of Platform 9 & 3/4 with their handmade owls, although I think I may have gotten the most involved with my Fleur Delacour/ Beauxbatons costume. One of my favorite parts of the day was when the young wizards started using spells on each other (along with my co-workers and me), who would promptly drop our wands at "EXPELLIARMUS!" and stand perfectly still at "PETRIFICUS TOTALUS!" Another extremely high point of the day was when a co-worker burst into the Children's Room, shouted, "TROLL! In the basement!" and then dramatically fainted. Overall, it was a very well attended and wonderful birthday party. I think even 34-year-old Harry Potter would have enjoyed it.


Tuesday, August 5, 2014

STEAM Team: Nature Hide and Seek with the Smithsonian American Art Museum

Peacock in the Woods, Abbott Handerson Thayer, 1907

Science and Art intersected in last week's STEAM Team program for children aged 6-12. Experts from the Smithsonian American Art Museum came to the Library to talk to attendees about Abbott Handerson Thayer and his artwork.

Here are some Thayer's paintings that we discussed.  Thayer is credited by many to be the "Father of Camouflage", in the way he painted animals whose colors adapted to their natural surroundings so that they would be hidden, or camouflaged from predators. We learned about countershading, disruptive patterning, and other ways of camouflaging through art.

According to Richard Meryman from Smithsonian Magazine, "Thayer contended that even brilliantly plumaged birds like the peacock can blend into, and thus be camouflaged by, their habitats." Thayer created the above painting, Peacock in the Woods, to illustrate this theory. Thayer was often criticized for his theories on camouflage, even by Theodore Roosevelt himself, but that never stopped him from rallying for its use as a military strategy during World War I. He thought that a wartime boat could be camouflaged in water the same way an animal camouflages itself in nature, another theory we will be discussing during STEAM Team.


Angel, Abbot Handerson Thayer, 1887

After our discussion about Abbott Handerson Thayer and his artwork, participants of STEAM Team got the chance to create their own piece of art of a camouflaged animal, using collage materials such as magazines, patterned paper, glue, feathers, and more!

My favorite part of the program?  The moment an extremely eager eight year old boy excitedly interrupted the Smithsonian's presentation to announce that Thayer's Angel painting "LOOKS JUST LIKE MISS CASSIE."

Wednesday, July 23, 2014

Art Attack: Googly Eyed Goons


I picked up an Art Attack (our craft program for teens, 13-19) on short notice and had to come up with something quickly.  If anything, I typically put too much effort and planning into my programs, so this was actually a good exercise for me.  Librarians should be able to come up with craft and program ideas on the fly.

So obviously, I went straight for my favorite craft material: GOOGLY EYES.  Then I glanced at the pictured Seventeen magazine with Miley Cyrus on the cover and it just came to me: she would look so amazing with googly eyes.  So I had teens go through our old magazines and cut out pictures of movie stars, heartthrobs, and the like, and put googly eyes on them.  Very simple and very fun.  I took the one I made of Jonah Hill and passed it to every teen and said "Just try not to laugh. I dare you."  Everyone laughed.  I'd like to think it was at my pun, but I think it was more the image of Jonah Hill with googly eyes.  They just make everything better.

Tuesday, May 13, 2014

DIY Book Charms


This week for Art Attack (our craft program for teens, 13-19), I gave participants the materials to make book charms.  I looked at a lot of ideas on the web and the ones that I liked best (and looked the easiest!) were made using little dollhouse books, only 5/8x by 7/8 of an inch!

I picked out some of my favorite YA titles, including old and new favorites:
  • The Fault in Our Stars by John Green
  • Hunger Games by Suzanne Collins
  • To Kill a Mockingbird by Harper Lee
  • Catcher in the Rye by J.D. Salinger
  • Divergent by Veronica Roth

If you save the images of these book covers into a Word document, you can right click the images and format them to the exact size of the books, which I bought on Amazon.

I also purchased eye pins to make the clasp on each charm.  I did this step ahead of time: coat the eye pin in superglue and insert it into the spine of the book.  Something about teenagers and superglue did not sit well with me, and quite frankly I got so much on my fingers I probably should not have been allowed to use it either!

Pretty much all of your prep work is done. When the teens were ready to make their book charms, I told the to trim down the cover image of their choice so that no edges were showing, since the image is the exact size of the book.  Next, they applied modge-podge (the homemade kind: Elmer's Glue + water) with a paint brush all over their book. After gluing down their cover, they put on another layer of modge-podge.  Doing these two layers will keep the paper from curling once glued, and give the book charm a nice shiny finish.

Finally, after allowing the books to dry for a few minutes, teens were able to finish off their book charms by adding a chain or cord to make it into a necklace, keychain, or bracelet.  Most wanted to wear their charms proudly around their necks, and one thoughtful brother made a TFIOS necklace for his sister, because "she's obsessed".  Fine by me!


Sunday, May 11, 2014

Happy Mommy's Day!


Sometimes unplanned "programs" are the best ones.  When I realized that we didn't have anything planned at the Library for Mother's Day, I quickly googled "how to make tissue paper flowers".  I found an excellent tutorial here.  I put out a sample flower of mine and sign that said, "Happy Mother's Day!  To make a special flower for your mom, please ask a Librarian for materials."  The materials are so simple- tissue paper, scissors and pipe cleaners!  I also cut out some paper butterflies using our AccuCut so that kids could give their flowers a label.  I tried prying a couple of kids off of the computers with no avail, but shortly a couple of families came in and the kids were very eager to make flowers for their mothers.

One little boy was getting ready to write on his butterfly, and asked me if he could write in another language.  I replied, "of course!  It's your flower!"  He wrote, "Te Amo, Mami".  When he handed it to his mother I could see that she was so proud and touched by his sweet little gift.  After making a few flowers, a little girl who spoke English as a second language sat down with me and we read Goodnight Gorilla by Peggy Rathmann together (she picked it out!), and after that she read it aloud to her mother.  Her mother, who seemed to speak limited English herself, beamed with pride as her little girl read to her.  Even though I had to work today and therefore could not spend the day with my own lovely mother, it's these interactions that make my job truly wonderful.  


Monday, April 14, 2014

Celebrating Caldecotts

Image via RandophCaldecott.org.uk
Beginning in 1937, the ALA began awarding the prestigious Caldecott medal to the illustrator of America's "most distinguished picture book for children." The medal gets its name from Randolph Caldecott, an influential 19th century English illustrator. The image on the Caldecott medal comes from his illustrations for The Diverting History of John Gilpin, a poem written by William Cowper.  Check out the entire list of Caldecott winners and Honors (runners-up) and pick out your favorite!

Children and their families got to enjoy a special Caldecott-themed storytime and craft this past weekend.  It was a beautiful day so I had a low turn-out for the storytime, but I continued to have the kids do the craft throughout the day and they LOVED it!  I started out the storytime by pointing out the "shiny gold sticker" on each book, and explained that it was a very special award.  I asked them to pay close attention to each book's pictures, since that is what they won their award for.  I had a small group of very eager and interested participants.

Here is the lineup...
  • Song: Hello, How Are You?
    • Our "Hello" song.
  • Book: A Sick Day for Amos McGee by Erin and Philip Stead (Winner, 2011)
    • One of my personal favorites, a sleepy story that went over surprisingly well with the little ones.
  • Song and Flannel: "I Went to the Zoo One Day" (sung to the tune of London Bridge)
    • I went to the zoo one day, zoo one day, zoo one day, I went to the zoo one day and I saw a _________! (Use flannels of different zoo animals and have children identify each one you put up on the board.)
  • Book: King Bidgood's in the Bathtub by Don and Audrey Wood (Honor, 1986)
    • Not as much of a hit as it has been in the past for preschool storytime, probably because this crowd was on the younger side and did not understand the story's silliness.
  • Flannel: Rub a Dub Dub Three Bears in a Tub
    • Bears are easier to make out of flannel than men!
  • Book: Kitten's First Full Moon by Kevin Henkes (Winner, 2005)
    • Probably the favorite pick for this group, little kitten is so endearing.
  • Flannel: Where is Kitten?
    • Substituted a flannel kitten for Mouse in the House- this flannel is always a favorite.  By chance the kitten was in the last house picked, and I had the kids meow so that kitten would be less shy and come out of her hiding spot.  They were thrilled.
  • Joseph Had an Overcoat by Simms Taback (Winner, 2000)
    • Attention spans were wandering at this point.  I would try it again as a first book.
  • Our Hands Say Thank You
    • Our "Goodbye" song.

For our craft I had children make their own Caldecott books.  The prep work for this project was extremely high but I do believe it was worth the effort because I've never seen a craft go over so well! They were so very proud of their Caldecott creations.  I pre-made booklets out of construction paper and blank white paper, and glued color-printed cutouts of the Caldecott medal to AccuCut award ribbons.  It was their job to glue their award onto the book, and to write and/or color pictures to create their own Caldecott winning story.  We had a story about a kitten, a dog, a bird, and someone named "Crispy" who found a map.  "Reading" their stories as they beamed with pride was my favorite part of the day.

Tuesday, April 1, 2014

STEAM Team: Robot Making!


This week's STEAM Team combined Technology, Engineering, and Art when I had participants create their own "robots" out of recyclable materials.  It only took me a couple of weeks to safe dozens of recyclables, especially thanks to it being the time of the year for Girl Scout Cookies.

Along with cans, boxes, aluminum foil, and bottles of all sorts, I provided many random things from the craft closet that I thought would make good robot parts: googly eyes, buttons, beads, dixie cups, masking tape, and plastic springs.  

Boys and girls alike were ECSTATIC about this program.  They loved picking out their own robot
parts and many kids made more than one robot.  I encouraged the children to design their robot with a purpose by asking, "What would you like your robot to do?  I want a robot that will walk my dog!"

They were creative and thoughtful, and used wonderful engineering skills to make their robots stand and balance. Many of them created their robots while not only doing the robot, but also speaking in robot language, which was pretty amazing.

This program was singlehandedly the most successful I've had in promoting our library collection, as every participant wanted a robot book to take home along with their new robot friend.


Wednesday, March 19, 2014

St. Patrick's Day Storytime

Long ago, St. Patrick's day began as a religious holiday that celebrated the arrival of Saint Patrick, who brought Christianity to Ireland. Today, it is celebrated in many parts of the world in the spirit of Irish heritage, culture and good luck! St. Patrick's Day celebrations of today include parades, feasts, Irish folklore and wearing the color green!  We got to celebrate it here at the library with a special storytime and craft.

Stories I read:

  • Green by Laura Vaccaro Seeger
  • Jamie O'Rourke and the Big Potato by Tomie DePaola (the board book shortened version)
  • St. Patrick's Day by Anne Rockwell
  • Good Luck Bear by Greg Foley

Songs/ Flannels:

  • Five Green and Speckled Frogs
  • Leprechaun, Leprechaun, Have you any Gold? (sung to the tune of Baa Baa, Black Sheep) ....Yes sir, yes sir, three pots full!  One for St. Patrick...
  • Find the Leprechaun (A variation of Mouse in the House, where Leprechaun is hiding underneath on of the felt houses)

Craft materials:

  • Green, Yellow, and Orange construction paper hearts
  • Green strips of construction paper
  • Hole puncher
  • Gold brads
  • Glitter glue or other decor

Directions: Punch holes at the bottom tips of each heart.  Do the same on a strip of green construction paper- this is your shamrock's stem.  Layer the pieces as pictured, and insert a brad through the holes to fasten the pieces together.  Decorate as you wish!

Erin Go Bragh! (Ireland Forever!)


Purim Party

The Purim Story

I am dressed up as Queen Esther!
Purim is a celebration of the Jewish people's salvation against threat of annihilation. In 4th century BCE, King Ahasuerus of Persia had a pageant to find a new wife after becoming angry with his current wife, Queen Vashti. He chose a Jewish girl named Esther, who had a cousin named Mordecai. Haman, the King's advisor, became angry with Mordecai when he refused to bow to him. Because of this, Haman resolved to have all the Jews in Persia killed. Queen Esther, who had not yet told the King that she was Jewish, told the King that if he let Haman kill all the Jews, he would have to kill her too. The King protected his wife and her people, and instead had evil Haman punished.  
Purim Traditions
Purim, therefore, is a celebration of life, and is a time for feasts and happiness. Hamantaschen, or "Haman's pockets" are pastries traditionally served during Purim. It is also customary to give to the poor during Purim, as well as dress in costume. This is partially because "Esther" means "hidden," and because she hid her Jewish origin from the King in the beginning. Another reason for wearing costumes during the holiday is that Purim is called a miracle "disguised in natural events," in comparison to overt miracles seen in other Jewish holidays. One fun thing for children to do during Purim is make groggers, or noisemakers. These noisemakers are to be used whenever the name "Haman" is spoken, so as to drown out the evil name.

At our library Purim Party, I told the story of Purim according to the book It Happened in Shushan: A Purim Story by Harriet K. Feder. The book doesn't have traditional illustrations, it rather intersperses pictures or symbols into the text to tell the story. To make the story interactive for the children, I made little flags for each character in the story: King Ahasuerus, Queen Vashti, Queen Esther, Cousin Mordecai, and Evil Haman. I made each character flag a particular color so that when each character was mentioned, I could announce, "Queen Esther! Hold up your purple flags!", for example. The children loved being involved and with the exception of no one wanting to be Haman (and why would they?), I think the interactive storytelling went well.

We also read Sammy Spider's First Purim by Sylvia A Rouss, which is an excellent book for showing little ones what the traditions of Purim are. We learned about going to the Synagogue, wearing costumes, making Hamantaschen ("Haman's Pockets"), and groggers. Groggers are noisemakers that children use whenever you hear Hama's name on Purim, so as to drown out the sound of the evil man's name.

This book was a great transition into our crafting for the party because we got to make groggers just like the one in the book. I premade the groggers by folding a paper plate in half, filled with a handful of dried pinto beans, and stapled along the edges. The children decorated their groggers with feathers, buttons, markers, and glitter glue. They also decorated masquerade masks which we wore as we paraded through the library, noisily shaking our groggers and shouting, "Happy Purim!" (The kids love being told to be noisy in the library!) My lovely coworker who assisted me with the program bought handmade hamantaschen from a local Jewish bakery and eating the delicious treats was a lovely ending to a lovely program. I don't think we had many children come to the library specifically for the program, but it was a busy enough Sunday where I was able to pull a bunch of kids away from the computers (yay!) and I had many children and parents thank me afterwards and tell me how much fun they had. They really enjoyed learning about and celebrating Purim!

Tuesday, March 18, 2014

The Itsy Bitsy Spider

This is a prop that I made to use with "The Itsy Bitsy Spider" during storytimes.  The children loved it but I'm not sure I will use it again, because I would rather have them participate with the hand movements, and it's hard to get them to participate if you are not doing the motions yourself.  Maybe I will sing the song once with the prop and sing it again as a fingerplay.

Materials needed:
  • Paper towel tube
  • Aluminum foil
  • Blue yarn
  • Black yarn
  • Large black bead (I colored a wooden one with a Sharpie)
  • Black pipe cleaner
  • Googly eyes
  • Glue
Directions:  Cover paper towel tube in aluminum foil.  Tie a long piece of black yarn around the black bead, and insert through the paper towel tube.  Tie back yarn so that it forms a loop inside the tube. Insert bits of black pipe cleaner through the black bead; these are the spider's legs. Glue the googly eyes onto the bead- your spider is complete!  Cut multiple lengths of blue yarn about twelve inches long. About six inches above the spider, tie these pieces of blue yarn to the black yarn.  This is your rain!  

The itsy bitsy spider climbed up the waterspout.
Down came the rain and washed the spider out.
Out came the sun and dried up all the rain
And the itsy bitsy spider climbed up the spout again!

Performance: Start the song by pulling the spider "up the waterspout" by pulling on one end of the black yarn.  Bring down the rain and "wash the spider out" by pulling on the black yarn in the opposite direction.  When the sun comes up and "dries up all the rain", pull the spider and the rain inside of the water spout again.


Saturday, March 15, 2014

STEAM Team: Art with Andy Warhol

Every Friday, our library hosts a "STEAM Team" program for children aged 6-12. STEAM is a framework for learning based on Science, Technology, Engineering, Art, and Math. 

I of course had to choose the main topic of Art when I led this program because there's really no subject I enjoy more.  I decided to have the children focus on the great American Pop artist Andy Warhol.  We started the program with a viewing of  Andy Warhol from Mike Venezia's "Getting to Know the World's Greatest Artists" series, based upon the identically titled popular book series also by Venezia.  The movie was about 20 minutes long, and was colorful and engaging for the kids. I had a child as young as three and as old as 10 present, and it seemed to appeal to all the age groups.


After the film, we made our own Pop Art projects.  I pre-cut many different colors of rectangles, kittens, and puppies (using the AccuCut) so that kids could pick out their own colors.  When they chose four rectangles, they glued them on to a sheet of construction paper for the background of the project. I made a sample project layering the kittens in the style of Warhol's Pop Art prints.  Not only did the children catch on to the layering technique right away, but I was also thrilled when they got super creative with their own projects.  (I always try to encourage them that their projects do not need to look like mine- I want them to be creative!)  As you can see, that is exactly what they did- we even had a child who wanted to use puppies and kittens (see below)!  They loved picking out their own colors and so far I haven't met a child get who did not like playing with glue.  Parents were thrilled and said they could not wait to come back for another STEAM event the following week. 


Tuesday, March 4, 2014

Happy Birthday, Dr. Seuss!


Dr. Seuss, born Theodor Seuss Geisel on March 2nd, 1904, has published 42 beloved children's books throughout his life of 87 years.  On March 2nd, 2014, we celebrated what would have been his 110th birthday.

We began with a special Dr. Seuss Storytime:
  • Song: "Hello, How are You?"
    • Our typical "Hello" song for storytimes.
  • Song: "Happy Birthday, Dr. Seuss"
    • This one is a bit self-explanatory, yes?
  • Flannel: One Fish, Two Fish, Red Fish, Blue Fish by Dr. Seuss (1960)
    • This book is a little but too long and confusing for the storytelling format, so I made it into a flannel!  They liked chanting along with me: "One fish, two fish, red fish, blue fish! Black fish, blue fish, old fish, new fish!"
  • Book: Gerald McBoing Boing by Dr. Seuss (1950)
    • One of Dr. Seuss's lesser known works, Gerald McBoingBoing was a film that Dr. Seuss made in 1950 that went on to win an Academy Award in 1951.  It was adapted into the picture book format in 1978 by Mel Crawford.  I took this as an opportunity to explain to kids that while many books can become movies (like The Cat in the Hat, The Lorax, and How the Grinch Stole Christmas, it can work in the opposite way!  The kids liked making the silly noises that Gerald makes throughout the book.
  • Flannel: The Cat in the Hat by Dr. Seuss (1957)
    • Another example of a great book that doesn't work too well for reading to a large audience, I adapted this too as a flannel activity.  On pages 20-21, the Cat in the Hat is showing off to Sally and her brother how many things he can hold while hopping on a rubber ball.  I turned each of these items into flannel pieces and asked the kids how many items they thought he could hold without falling down or dropping any of them.  It sort of ended up like playing "Jenga" on the flannel board with the kids anxiously watching me add item after item while reading along the text on page 20. On the next page follows, "That is what the cat said... Then he fell on his head!  He came down with a bump from up there on the ball.  And Sally and I, we saw all the things fall!"  As I read this text, I swiped my hand over the flannel board and watched as the Cat in the Hat fell down along with all of his silly items.  The kids loved it.
  • Book: My Many Colored Days by Dr. Seuss (1973)
    • This is another lesser known work of Dr. Seuss, perhaps because it is not self illustrated, instead with pictures by Steve Johnson and Lou Fancher.  Still it is a great storytime book about colors and feelings, and the kids enjoyed helping me identify the colors on each page.
  • Song: Silly Hat 
    • Since the Cat in the Hat has a silly hat, I brought out my silly hat to show my friends and sing this favorite song.
  • Book: Mr. Brown Can Moo! Can You? by Dr. Seuss (1970)
    • This book is a wonderful participatory book that gives great variation on the typical animal noises we see in these types of books. Along with "Moo, Moo", the kids got to make all kinds of noises, like "Choo Choo", "Sizzle Sizzle", and "Tick Tick Tock", among many others!
  • Flannel: Cat under the Hat 
    • Borrowed from my "Silly Hat" storytime, this is another great flannel that can be adapted for almost any theme.  I explained to the kids that instead of wearing his hat, the Cat in the Hat was hiding and they had to help me find him!  They excitedly found him on the third try (he was under the purple hat).
  • Our Hands Say Thank You 
    • Our typical goodbye routine for storytimes.  The kids love to clap, tap their feet, and "Rollllll our hands to say 'Goodbye'!"

Dr. Seuss Crafts

After our storytime, the kids were able to do my favorite activity: crafts!  I was very excited about the Lorax mustaches on a stick, but I think the kids liked the Dr. Seuss hats better because it was a little bit easier for them (the approximate age of my audience was 4 or 5 years old).  Anyways it was nice to give them a choice of what to do and a lot of kids did both, and they were super cute running around wearing their hats and mustaches together.


For materials, we are lucky enough to have a silly hat pattern for our Accucut, which I punched out of cardstock and cut long strips of paper for the base of the hat: super easy prep work!  The Lorax mustaches were a bit more involved.  I drew the mustache then made copies of it on cardstock, cut up bits of yarn for Lorax fur, and found some foam beads in the craft closet to use as Lorax noses.  If I had had more time I think it would have helped to cut out the mustaches myself, because that's where a lot of kids got snagged up and needed help or said it was too hard and wanted to make the hat instead.  Other necessary materials to have on hand were markers, glue, scissors, and popsicle sticks.

Overall the birthday party was a wonderful success.  I will be repeating the storytime for my preschool daycare groups that come in this week since they weren't here for the party.

One more activity that I had available for the kids: coloring sheets, mazes, word-searches and other printable activities from Seussville.  What a wonderful resource!  I will leave these out for kids to work on throughout the month of March.


Saturday, February 8, 2014

Silly Hat Storytime

We recently started a new Saturday morning family storytime.  This is great for two reasons: one, parents who work throughout the week can attend (during the week we mostly get nannies and daycare centers) AND I get to pick a theme!!!  With an all ages audience, we have some more leeway when it comes to themes, which is why I usually don't do a theme for a specific age range; it ends up being too limiting to appropriate book choices.  Anyways, for my first Family Fun Time Storytime, I did SILLY HATS!
Silly Hat Storytime 
  • Song: Hello, How Are You?
    • Our typical "Hello" song for storytimes. 
  • Book: Whose Hat? by Margaret Miller (1988)
    • The kids loved this, as they got to identify who each hat belongs to (i.e. a witch, policeman, nurse, etc.)
  • Puppet: Fat Cat in Hats
    • I used hats from our dress-up set to put on my fat cat puppet Maurice and asked the kids to identify them. This was a nice continuation of Whose Hat? and the kids always love seeing Maurice.
  • Book: Caps for Sale by Esphyr Slobodkina (1947)
    • This was probably the crowd's favorite book of the storytime, and no wonder, it's a classic!  My favorite part was when an infant was shaking her fists right along with the monkeys.
  • Song: and Flannel: No More Monkeys Jumping on the Bed
    • Always a favorite!
  • Book: I Want My Hat Back by Jon Klassen (2011)
    • I wouldn't read this for storytime again.  Since the story is basically told through dialogue, I think it's a little hard to follow just by listening.  I get the humor in it, but I don't think the kids do.  In fact, it's a little terrifying for wee ones, as the rabbit gets eaten by the bear in the end.
  • Song: On My Nose I Have a Hat
    • Kids love participating with this song by offering answers to the question, "Where else can my silly hat go?"
  • Book: The Hat by Jan Brett (1997)
    • I've said it before: Jan Brett is among the best of the best!  It's still winter so this was a nice choice, and the children listened intently.
  • Flannel: Little Rat and Hat
    • A variation of "Little Mouse in his House":  I put up five different colored hats and ask the kids to help me find my missing rat.  Someone guesses green, and I say, "Little rat, little rat, are you in the GREEN HAT?"  It is always extremely exciting for them when we finally find the rat.  I like this flannel because it's easily changed for a theme and it is always a favorite.
  • We Wave Goodbye Like This 
    • Our typical "Goodbye" song for storytimes.
  • Our Hands Say Thank You
    • The final finishing touch: "Our hands say 'Thank You' with a clap clap clap!  Our feet say  'Thank You' with a tap tap tap!  Clap clap clap!  Tap tap tap! And we rollllllllll our hands to say, 'Goodbye!'"
  • Craft: Jan Brett's characters and hats, a matching game craft!  Jan Brett's crafts are so simple and easy to prepare, and kids love them.  This was perfect for multiple ages.


Tuesday, February 4, 2014

Freedom Quilt


This past weekend we hosted a Black History Month Kickoff Celebration.  My coworkers hosted a puppet show/ storytime, and I helped the kids to create our library's very own Freedom Quilt!

Legend has it that during the times of the Underground Railroad, African American slaves used quilts along the Underground Railroad to communicate messages and signals that would help them to escape to freedom. Different patches on these Freedom Quilts conveyed varying messages, such as following the North Star, identifying friendly houses for shelter, or following a safe mountain trail.

To prepare for this craft program, I pre-cut quilt squares made from some patterned paper I found in our magical craft closet.  I hole punched each corner and added a bit of red yarn to all four corners of each square.  Finally, I pre-cut a variety of squares and triangles so that the children could make their own patterns on their quilt squares.  I provided some examples for them to look at (Shoofly, Monkey Wrench, Hourglass, Star, Crossroads, and Flying Geese) and was pleasantly surprised when all of the participants creatively came up with their own designs by cutting, coloring, and gluing the shapes onto their squares.

Once the squares dried overnight, I tied each corner together to make our quilt.  There was a fairly heavy amount of prep-work involved with this project, but I am so pleased with the results.  The quilt is now proudly hung on display outside our children's room.  Not one child was disappointed that they couldn't take their quilt square home; instead they were excited and proud to have their work displayed in the library! 

Monday, January 27, 2014

Martin Luther King Jr. Peace Mural

A staff member at another branch had a wonderful idea for a creative collaboration among the different branches of our library system.  Each branch made a Peace Mural in honor of Martin Luther King Jr's birthday.  The murals will eventually be put together into one large mural that will go on display here at our main library.


I chose AccuCut stencils of a dove and of Martin Luther King Jr.'s silhouette for the kids to decorate. We had some cut-outs in the Children's Room and some in Teen Space for kids to complete throughout King Week.  We encouraged them to decorate their "peace symbols" with their own ideas of what peace means, as well as their dreams of peace in the style of Martin Luther King Jr's "I Have a Dream" speech.
I was very impressed at the amount of participation that went into this passive program, especially from teenagers who are usually so reluctant to participate in library programming.  As you can see, however, many children and teens were able to express their ideas of peace creatively and beautifully (and adorably!).  I am thrilled with the results.